Place Wall Polygon
 Place wall polygon tool is used to manually digitize closed wall polygons.
The tool produces line elements with properties specified in wall settings. The tool is designed to be used in a top view.
To place a wall polygon:
1. Select the Place Wall Polygon tool.
The Place Wall Polygon dialog opens:
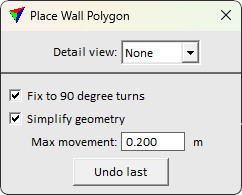
2. Define settings.
SETTING |
EFFECT |
|---|---|
Detail view |
The number of the detail view. If None, no detail view is used but elements are digitized in any view. |
Fix to 90 degree turns |
If on, vertices of the finished wall polygon are shifted to create right angles when possible. |
Simplify geometry |
If on, unnecessary vertices of the finished wall polygon are removed. |
Max movement |
Limit for changes when finished wall polygon is adjusted. |
Undo last |
Click on the button in order to delete the last vertex that was placed while digitizing the wall polygon. |
3. Place a vertex at a wall corner.
4. Pan to the next building corner.
OR if detail view is defined
3. Locate approximate position of a wall corner in some other than detail view.
This focuses the detail view to show the position picked.
4. Place a vertex to the wall corner.
5. Repeat steps 3 and 4 until the wall polygon is done.
You can click on the Undo last button in order to delete the last vertex that was placed. The undo action can be applied several times.
6. Press the reset button to finish the wall polygon.