Validate groups
Validate groups command supports the systematic check of groups. It evaluates groups against defined criteria, and lists the groups not passing the validation criteria for further inspection and modification.
During the inspection of invalid groups, the selected group is automatically centered in the view 1. The group becomes the active displayset and thus, it is displayed in views for which Points is set to Displayset only in the Display mode dialog.
To validate groups:
1. Select the Validate groups command from the Groups pulldown menu.
This opens the Validate Groups dialog:
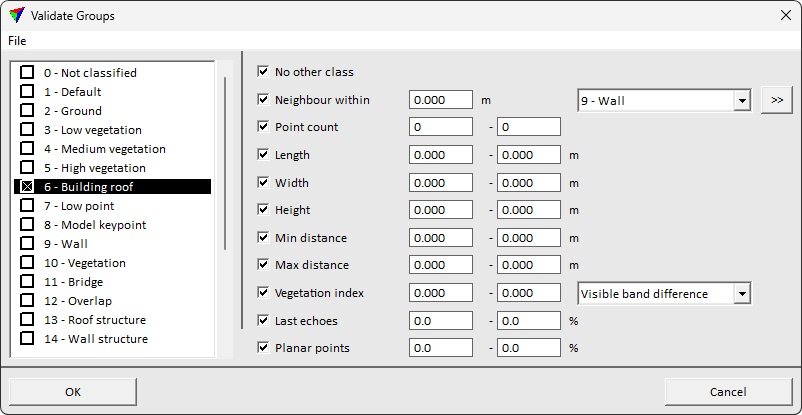
SETTING |
EFFECT |
|---|---|
File / Open |
Open validation rules from a text file. |
File / Save |
Save validation rules to a text file. |
File / Save as |
Save validation rules to a new text file. |
<Class list> |
Enabling a class includes the class into validation. Activating the class by clicking the class name highlights the class and displays validation rules for the activated class. |
No other class |
If on, groups including points from the active class are valid only if containing no points from other classes |
Neighbour within |
Specifies the maximum allowed gap between the group and the closest point in the specified class(es). The distance is evaluated in three dimensions between the closest points. |
|
Opens the Select classes dialog which contains the list of active classes in TerraScan. You can select multiple source classes from the list that are then used in the validation field. |
Point count |
Specifies the expected point count range for valid groups. |
Length |
Specifies the length range for valid groups. |
Width |
Specifies the width range for valid groups. |
Height |
Specifies the height range for valid groups. |
Min distance |
Specifies the minimum distance range for valid groups. |
Max distance |
Specifies the maximum distance range for valid groups. |
Vegetation index |
Specifies the vegetation index range for valid groups. Available vegetation indices: •Normalized difference - Normalized Difference Vegetation Index. Available only if four color bands available. •Visible band difference - available only if color available. •<User vegetation index> - vegetation index defined in User vegetation indexes. |
Last echoes |
Specifies how big percentage of group points must be last returns of the laser pulse. |
Planar points |
Specifies how big percentage of group points must have planar type normal vector. |

2. Enable the classes to validate.
3. Click each class active at a time, define validation settings to apply for the class and click OK.
This opens Inspect Groups dialog that lists the invalid groups:

SETTING |
EFFECT |
|---|---|
View / Fields... |
Select the column(s) to show in group list. Available options: •Group id - numeric identifier of the group. •Display color - The active group color if view Display mode set to group based coloring. •Point count - the number of points belonging to the group. •Classes - point class number. •Best match rating - the classification confidence evaluated with By best match routine. •Issue - the validation rule the group did not fulfill. This is available only if using validate groups. •Height - the difference between highest and lowest Z coordinates in the group. •Width - the horizontal width of the group. Width is measured towards the minor axis of the group points. •Length - the horizontal length of the group. Length is measured towards the major axis of the group points, perpendicular to Width. •Radius - the horizontal radius of the group. A descriptive average between Height and Width. •Minimum/Maximum distance - the lowest/highest distance attribute value in the points of the group. •Average amplitude/deviation/intensity/reflectance/reliability - the average value of the point attribute in a point group. •Trunk diameter - the trunk diameter according the circular measurement element. The elements may be created by the Measure Trunk Diameters tool. •Trunk volume - the trunk volume according the circular measure elements. The elements may be created by the Measure Trunk Diameters tool. •Lowest/Highest diameter - the height from ground of the lowest/highest trunk measurement element. •Minimum/Maximum diameter - the diameter of the smallest/largest trunk measurement element for this group. •Diameter span - the percentage of tree height covered with trunk measurements. Percentage value comparing the height between the lowest and the highest trunk measurement, and the complete tree group height. •Diameter count - the number of trunk diameter elements labeling this group. •Worst diameter mismatch - the biggest offset between the drawn circle and the points used by Measure Trunk Diameters process. Emphasize significantly high values setting the Hilite limit tolerance. |
View / Sort... |
Select the attribute to sort the group list. Rows are sorted to the ascending order. The attributes available for sorting are the same as for listing through View / Fields excluding issue field. |
Remove |
Removes the selected group from the list. The group itself is not deleted or classified. |
Show location |
Select a line in the list, click on the button and move the mouse pointer inside a view window. This highlights the selected group in the view. |
Identify |
Click on the button and identify a group with a data click in a view window. This selects the corresponding line in the list. |
4. Select a line in the list of groups.
This centers the selected group in View 1. You can, for example, modify classification or grouping of points with tools in Model or Groups toolboxes.