Rail section templates
Rail section templates category shows a list of rail section definitions that can be used for automatic rail vectorization using the Find Rails tool.
A drawing of the rail section can be used to define the geometry of a rail section template. Both rails of the rail section must be drawn into a CAD file using the correct measures. It is an advantage to draw them in a way that the center point of the rail section is at the CAD file origin (coordinates XY = 0,0). As an alternative, you can also define a rail section by typing the start and end point coordinates of section lines in an input dialog.
You can Add, Edit, and Delete rail section templates by using the corresponding buttons in the Settings dialog. You can Add, Edit, and Delete parts of a rail section templates by using the corresponding buttons in the Rail section template dialog.
To add a new rail section:
1. (Optional) Draw the rail section into a CAD file and select it.
2. Open the Rail section templates category.
3. Click Add in the Settings dialog.
The Rail Section Template dialog opens:
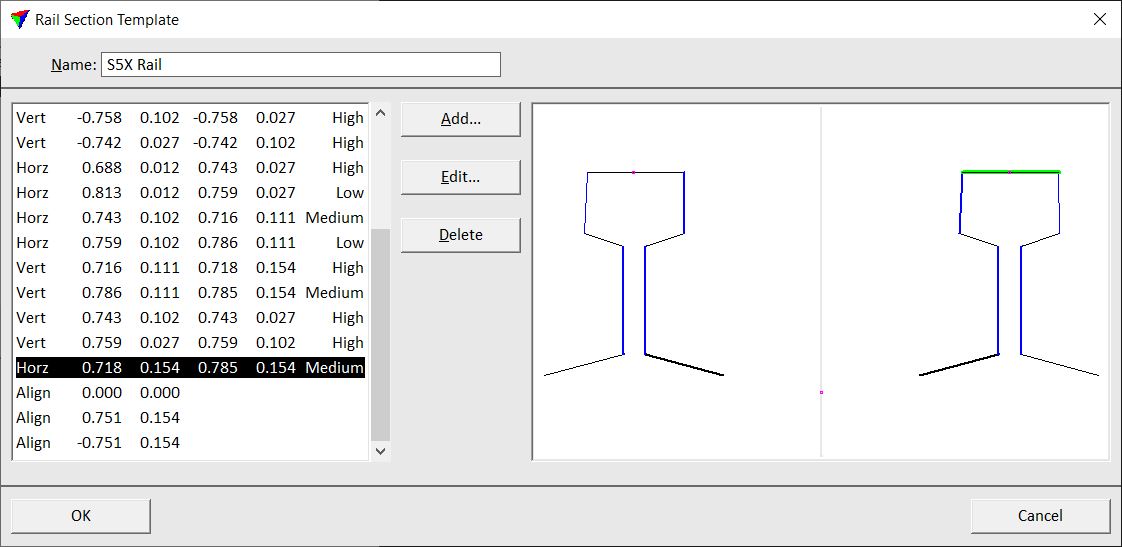
If a section drawing has been selected, the section definition is shown in the dialog.
The dialog shows the list of rail section elements on the left side. A preview of the rail section is shown on the right side. In the preview, horizontal elements are drawn in blue, vertical elements in black, void elements in red. Elements of high weight are drawn with a thicker line, medium and low weight elements with thinner lines. Alignment positions are marked with a small red dot. An element selected in the list is highlighted in green in the preview.
4. Type a Name for the rail section.
5. Click Add in the Rail Section Template dialog in order to add a new element to the section.
OR
6. Select a line in the list of section elements and click Edit in the Rail Section Template dialog in order to edit an existing element of the section.
The Rail Section Line dialog opens:
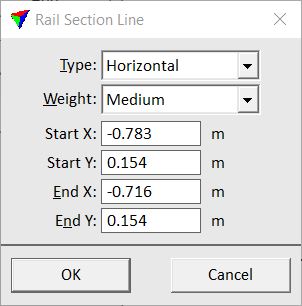
7. Define settings and click OK.
8. Add/Edit more elements of the section if necessary.
9. Click OK in the Rail Section Template dialog.
10. Close the Settings dialog in order to save the rail section template settings for TerraScan.
SETTING |
EFFECT |
|---|---|
Type |
Type of the rail section line: •Horizontal - horizontal line as part of the rail section. Used to find the Z location of a rail in automatic rail detection. •Vertical - vertical line as part of the rail section. Used to find the XY location of a rail in automatic rail detection. •Void - line that indicates a location without laser data close to rails. •Alignment - location of linear vector elements that are drawn in automatic rail vectorization. |
Weight |
Weight of a rail section line: Low, Medium, or High. A line with higher weight takes priority over lines with lower weights in automatic rail detection. This is active only if Type is not set to Alignment. |
Start X | Y End X | Y |
Start and end point coordinates of a rail section line. Given in the rail section’s coordinate system. The origin of the system (0,0) should be in the center of the rail section. This is active only if Type is not set to Alignment. |
Position X | Y |
Location of an alignment element. Given in rail section’s coordinates. This is active only if Type is set to Alignment. |
Rail section templates are stored in a configuration file RAIL_SECTIONS.INF in the TerraScan installation folder. You can copy this file to other computers in order to make rail section templates available on them.