Import points into project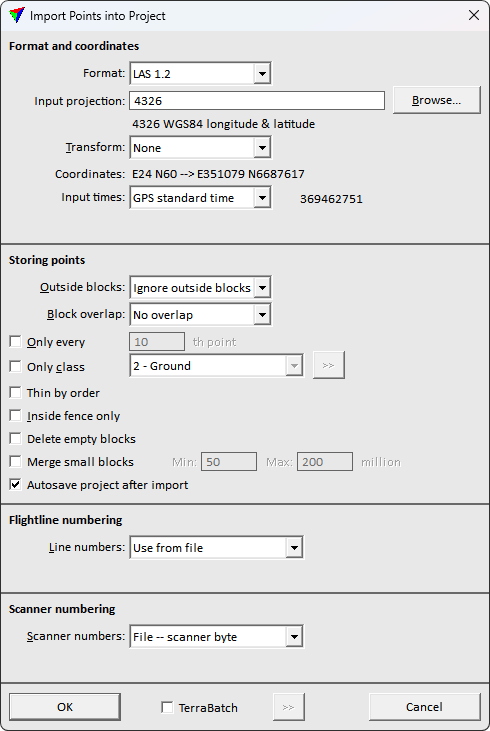
Not UAV
Import points into project command imports point files into a project. The process reads the points from the input files and stores them into new files according to the block definitions. As a result, there is a new point file for each block of the project.
The file names and the format are derived from the block names which contain the name itself and the extension depending to the selected storage format. Thus, a file that is created in the import process is linked to a project by its name and extension.
To import points into a project:
1. Select Import points into project command from the File pulldown menu.
This opens the Import points into project dialog, a standard dialog for open files.
2. Select input files and click Open.
This opens the Import Points into Project dialog.
3. Define settings and click OK.
This starts the import of the input files. A progress bar shows the progress of the process.
After all files are imported, TerraScan shows a report. The report lists the imported files, the amounts of imported and ignored points for each file, and the overall amounts of imported and ignored points. It can be saved as a text file or sent to a printer by using commands from the File pulldown menu of the report window. If the import is done by TerraBatch, the report file is stored in the TerraBatch reports folder, such as C:\Terra64\tBATCH\reports.
SETTING |
EFFECT |
|---|---|
Format |
Format of the input files. This is automatically recognized by the software. For ASCII files, there might be more than one option. |
Input projection |
Projection system of the input point cloud data. The software shows the system information if it is stored in the input file header. To change the projection system, click on the Browse button. This opens the Browse for Projection System dialog. The dialog provides a search option for projection systems as well as a list of all implemented systems. In addition, any user-defined projection systems are included in the list. If another projection system is defined in the project definition, a projection change transformation will be applied during the import process. |
Transform |
Additional transformation applied to the points during the import process. The list contains transformation that are defined in Coordinate transformations / Transformations category of TerraScan Settings. |
Coordinates |
Display of the Easting and Northing coordinates of the first point in the data set before and after importing the points. If the values are the same, no transformation is applied during the import. |
Input times |
GPS time format of the time stamps in the input files. The import process converts the time from this format to the format specified in Project information. |
Survey date |
Date when the data was captured. The format is day/month/year (dd/mm/yyyy). This is active only if Input time is set to GPS seconds-of-week and the time stamp format for the project is set to GPS standard time or GPS time. |
Outside blocks |
Defines how points outside the block boundaries are handled: •Ignore outside blocks - points outside boundaries are ignored. •Ignore outside selected - points outside selected block boundaries are ignored. This is active only if blocks are selected in the list of blocks in the Project window. •Create grid blocks - the software creates new blocks for the points outside boundaries. The size and names of the new blocks are defined by the setting in the Project information dialog. |
Only every |
If on, only every n th point of the input files is imported where n is the given value. |
Only class |
If on, only points from the selected point classes are imported. Click on the >> button in order to open the Select Classes dialog. It provides a list from which you can select several classes. |
Thin by order |
If on, points are thinned out during the import process if consecutive points are within the given Dxy and Dz limits. This may ignore points in the import process and result in a lower point density than provided by the original point cloud. |
Inside fence only |
If on, only points that are located inside a fence or selected shape element are imported. |
Delete empty blocks |
If on, blocks without points located inside the block area are deleted from the project definition. |
Merge small blocks |
If on, blocks with a small amount of points inside the block area are merged with neighboring blocks. The Min and Max values define the minimum and maximum amount of points per block. Blocks are only merged if the amount of points is smaller than the given minimum and if the merged block does not exceed the given maximum. |
Autosave project after import |
If on, the project file is saved automatically to the hard disc when the import process is finished. |
Default |
Point class that is assigned to all imported points if no class attribute is stored in the input files. This is active only if Format is set to any text file format that does not include the class attribute. |
Line numbers |
Defines, how line numbers are assigned to the points during the import process: •Use from file - line numbers from source files are used. •Assign constant - the number given in the First number field is assigned to all points. •First number in name - the first numerical sequence in a file name is used as line number. •Last number in name - the last numerical sequence in a file name is used as line number. •First number in folder - the first numerical sequence in the name of the folder containing the input files is used as line number. •Last number in folder - the last numerical sequence in the name of the folder containing the input files is used as line number. •Deduce using time - numbers are assigned based on trajectories loaded into TerraScan. The same process can be performed for by the Deduce using time command or the corresponding macro action. •Increase by xy jump - the line numbers increase from the given First number if the xy distance is bigger than the value given in the By distance field. •Increase by time jump - the line numbers increase from the given First number if a jump in time stamps occurs. This requires that trajectory information is available in TerraScan. •Increase by file - the line numbers increase from the given First number for each separate file. •Increase by file name - the line numbers increase from the given First number for each file with another file name. Files with the same name get the same number. •Increase by directory - the line numbers increase from the given First number for each file stored in another source folder. Files from the same source folder get the same number. The availability of options depends on the number of input files and the attributes stored for points in the input files. |
Scanner number |
Defines, how scanner numbers are assigned to the points during the loading process: •File -- scanner byte - scanner number stored in the 8-bit user data field is used. This is the normal way of storing a scanner number. •File -- scanner channel - scanner number stored in 2-bit scanner channel field of LAS/LAZ 1.4 files is used. This may be relevant for LAS/LAZ 1.4 files only. •Assign constant - the number given in the First number field is assigned to all points. •Increase by file - the scanner numbers increase from the given First number for each separate input file. •First number in name - the first numerical sequence in a file name is used as scanner number. •Last number in name - the last numerical sequence in a file name is used as scanner number. •First number in folder - the first numerical sequence in the name of the folder containing the input files is used as scanner number. •Last number in folder - the last numerical sequence in the name of the folder containing the input files is used as scanner number. •From line number - the line number is used as scanner number. The availability of options depends on the number of input files and the attributes stored for points in the input files. |
TerraBatch |
If on, the import process starts in TerraBatch. TerraScan can be used for other tasks while the import runs in TerraBatch. |
|
Opens the TerraBatch Task Settings dialog. You can select or deselect computers that will participate in the import task. See TerraBatch User Guide for more information. |

If you import new points into a block that already contains points, the additional points are added to the existing block binary file. Therefore, if the import of raw data needs to be repeated, you must delete the existing block binary files before starting the next import process.