Find Range Corrections
 Find Range Corrections tool solves range corrections for different intensity values, scanners or angles. Very high intensity values may cause a wrong elevation value for the laser points which leads to local inaccuracies at such locations. Usually, points with high intensity values are a bit raised from the surrounding surface and from their correct elevation level. The system manufacturer provides a range correction file specific for the system. The Find Range Corrections tool can be used to adjust the values from this initial system-specific correction.
Range corrections per scanner can be used to correct little elevation differences in data from several scanners or scan heads. This results in less noise in data collected with a multiple-scanner system.
Range corrections per angle can be used to correct little elevation differences in data caused by scan angles.
Finding range corrections requires laser data from a smoothly changing hard surface with different intensities or from different scanners. The points on the surface must be classified into a separate class. For airborne scanning, data from the airport runways with strong white paint markings are good locations for collecting suitable data for intensity-based range correction. For mobile scanning data or UAV data, a road or a parking space with a special calibration mat for intensity-based range correction can be used.
The tool provides adjustment values for different intensities or scanners in a TerraMatch correction file. The correction file can then be used to apply the corrections to the laser data of a project. There is also an option for combining the intensity-based corrections found in TerraMatch with a the range correction values provided by the system manufacturer.
To find range correction:
1. Load the laser data into TerraScan from the area that is suitable for finding range corrections.
2. Select the Find Range Correction tool.
This opens the Find Range Correction dialog:
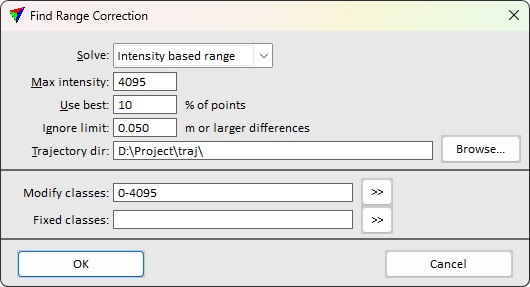
3. Define settings and click OK.
Setting |
Effect |
|---|---|
Solve |
Type of range correction: •Intensity based range - corrections for intensity-based range inaccuracies. •Range per scanner - corrections for scanner-based range inaccuracies. •Range per angle - corrections for angle-dependent range inaccuracies. |
Max intensity |
Maximum intensity value for which range corrections should be found. Common values are 255 for 8 bit intensity, 4095 for 12 bit intensity and 65535 for 16 bit intensity data. This is only active if Solve is set to Intensity based range. |
Max angle |
Maximum scan angle value for which range corrections should be found. This is only active if Solve is set to Range per angle. |
Use best |
Defines what points the software uses for finding range corrections. The software uses the given percentage of points with the highest local intensity variation. This is only active if Solve is set to Intensity based range. |
Ignore limit |
Helps to avoid bad observations. The software ignores observations with a elevation difference bigger than this value. |
Trajectory dir |
Directory containing TerraScan trajectory files. |
Modify classes |
Classes to use for finding range corrections. Applying the correction adjusts points in these classes. |
Fixed classes |
Classes to use for finding range corrections. Applying the adjustment does not modify points in these classes. |
This opens the Range Correction Results dialog.
The dialog for Intensity based range or Range per angle corrections is shown below:
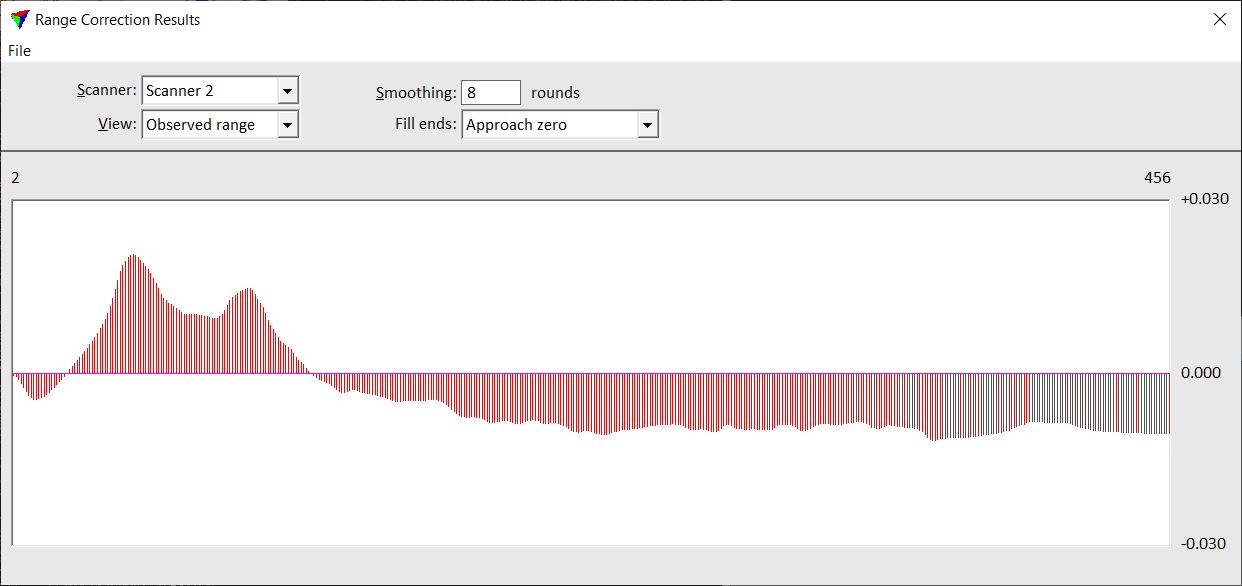
Setting / command |
Effect |
|---|---|
Scanner |
Number of the scanner for which to apply range corrections. |
View |
Intensity value range for display: •Whole range - whole range from 0 to Max intensity. •Observed range - intensity range avaiable in the used points. |
Smoothing |
Number of smoothing rounds to apply to the correction curve. |
Fill ends |
How to assign correcion values to very small or very large intensity values for which there are no observations: •Approach zero - correction values linearly approach zero. •Closest observation - uses correction value of the closest intensity value with an observation. |
File / Save correction |
Saves a TerraMatch correction file for being used in the Apply Correction tool. |
File / Merge with system file |
Adds the corrections to another correction file provided by the system manufacturer and saves a TerraMatch correction file for being used in the Apply Correction tool. |
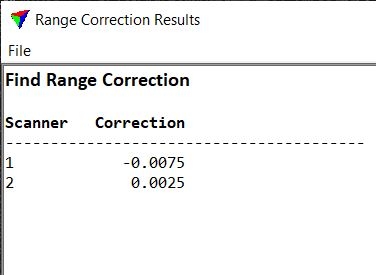
The dialog for Range per scanner corrections just shows the correction value for each scanner:
4. Define settings for Intensity based range or Range per Angle corrections.
5. Save the TerraMatch range corrections using the Save corrections command from the File pulldown menu.
For Intensity based range or Range per angle corrections, you can also use the Merge with system file command from the File pulldown menu in order to create a correction file that includes system-specific corrections.
6. Close the Range Correction Results dialog.
7. Apply the range corrections to laser data using the Apply Correction tool.