Place tile array
Not Lite
Place tile array command places an array of tile rectangles which can be used as orthophoto boundaries. The area covered by the tiles can be defined by laser points loaded in TerraScan, the footprints of the active image list, or selected shapes.
Placing a tile array only works if a mission, a ground model, and an image list are loaded into TerraPhoto.
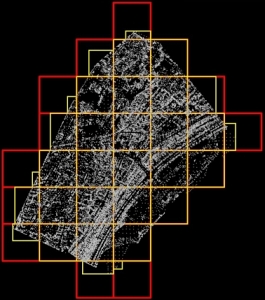
The size of the tiles is defined in pixels. Width and height of a tile can be constant (all tiles have the same size) or variable (tiles are minimized at coverage area boundaries). The figures below the command description illustrate different settings for array type, tile width and height.
To place an array of tile rectangles:
1. Select Place tile array command from the Rectify pulldown menu.
This opens the Place Tile Array dialog:
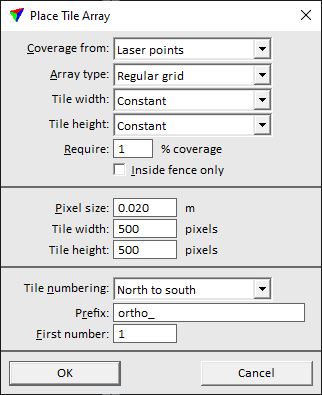
2. Define settings and click OK.
This places an array of tile rectangles on the active level using the active symbology settings in the CAD file.
SETTING |
EFFECT |
|---|---|
Coverage from |
Source from which to determine the covered area: Image footprints, Laser points, or Selected shapes. |
Array type |
Tile pattern to construct: •Regular grid - regular tile pattern. The positioning is organized as multiple of the nominal tile size. •X axis filling - tiles are extended horizontally. •Y axis filling - tiles are extended vertically. •Tile for each shape - creates an orthonormal tile for each selected shape at even pixel boundaries. This is only available if Coverage from is set to Selected shapes. |
Tile width |
Determines the tile width: •Constant - all tiles have a constant width. •Minimized by coverage - the width is minimized to the coverage area. This is not available if Array type is set to Tile for each shape. |
Tile height |
Determines the tile height: •Constant - all tiles have a constant height. •Minimized by coverage - the height is minimized to the coverage area. This is not available if Array type is set to Tile for each shape. |
Require |
Percentage of tile size that image footprints, laser data, or selected shapes must cover for the tile to be placed. This is not available if Array type is set to Tile for each shape. |
Inside fence only |
If on, tiles are placed to cover fence contents only. This requires the placement of a fence before the command is started. |
Pixel size |
Intended pixel size of the orthophotos. |
Tile width |
Width of a nominal tile in pixels. This is not available if Array type is set to Tile for each shape. |
Tile height |
Height of a nominal tile in pixels. This is not available if Array type is set to Tile for each shape. |
Tile numbering |
Order for placing text elements inside tiles: •None - no text elements are created. •North to south - increasing numbering from north to south and west to east. •South to north - increasing numbering from south to north and west to east. •East to west - increasing numbering from east to west and south to north. •West to east - increasing numbering from west to east and south to north. •Along element - increasing numbering in the direction of a selected linear element. |
Prefix |
Text that is included in the text elements before the numbering. This is only active if Tile numbering is not set to None. |
First number |
Number of the first tile and amount of digits used in the text elements. This is only active if Tile numbering is not set to None. |
The Place Tile Array dialog can also be opened by using the Place Tile Array tool.
|
|
Regular grid 2000 x 2000 pixels with constant (red) and minimized (yellow) width and height. |
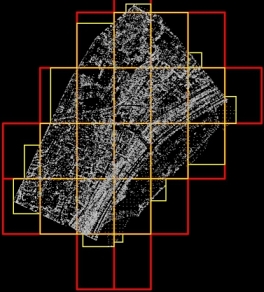
Regular grid 2000 x 3000 pixels with constant (red) and minimized (yellow) width and height. |
|
|
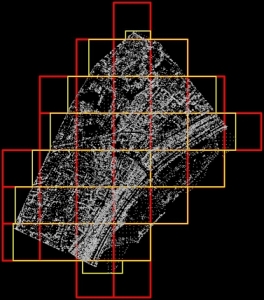
X axis filling with tile height 2000 pixels (yellow) |
Y axis filling with tile width 2000 pixels (yellow) |